
By continuing, you agree to LoansJagat's Credit Report Terms of Use, Terms and Conditions, Privacy Policy, and authorize contact via Call, SMS, Email, or WhatsApp
Disclaimer: The information published on LoansJagat is intended for general informational and educational purposes only and should not be considered financial, legal, or investment advice. Interest rates, loan terms, statistics, and other data may change over time and may vary by lender or source. Please verify the latest information and consult a qualified financial advisor or the respective Bank/NBFC before making any financial decisions.
Subscribe Now
About the author
LoansJagat Team
Contributor‘Simplify Finance for Everyone.’ This is the common goal of our team, as we try to explain any topic with relatable examples. From personal to business finance, managing EMIs to becoming debt-free, we do extensive research on each and every parameter, so you don’t have to. Scroll up and have a look at what 15+ years of experience in the BFSI sector looks like.
Related Blog Post
Simplify All Your Loans Into One Affordable EMI
Customers Served
Debt Consolidated
1200+ Reviews
Locations in India
Club all Loans & Credit Card Bills into Single EMI
Quick Apply Loan
Consolidate your debts into one easy EMI.
Takes less than 2 minutes. No paperwork.
10 Lakhs+
Trusted Customers
2000 Cr+
Loans Disbursed
4.7/5
Google Reviews
20+
Banks & NBFCs Offers
Other services mentioned in this article
Internet and mobile banking have lightened the burden of life. According to new research by McKinsey, internet banking has increased by 28%, and mobile banking has seen a rise of an astonishing 83% across the Asia Pacific region.
In 2024, it was a great start for UPI because the transactions remained above ₹18 lakh crore, hitting a new peak. More people prefer digital payment over cash, as it has proved to be so easy and very flexible. This shows how banking has changed to fit better with what people need today."
According to co-founder and CEO of Fibe, Akshay Mehrotra, "steady increases show how much banking has transformed into being easy and liquid."
Canara Bank also introduced net banking so customers can manage their accounts online. This service helps people do banking without leaving home, making it easier to access their money and perform transactions at any time.
Started as Ammembal Subba Rao Pai in 1906 at Mangalore, Canara Bank became a government bank in 1969 and operated through branches in India, cities like London, Dubai, New York, and many other places. The bank wishes to be the best by aiming at profitability, efficiency, and safety while embracing new technologies.
Canara Bank can accommodate different services such as a savings account, loans, credit cards, debit cards, and so many others that make banking comfortable and accessible to customers worldwide.
This table shows what services Canara Bank Net Banking provides:
.jpeg)
Service | Description |
Balance Enquiry | Check your account balance without visiting the bank. |
Bill Payment | Pay your gas, water, electricity, phone, or internet bills. |
Here are some key documents needed to register for Canara Internet Banking services; these things will be required to register.
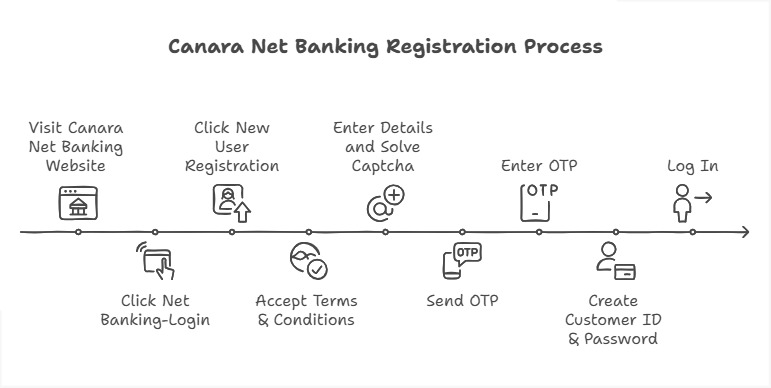
Step 1: Visit the official website of Canara Net Banking.
Step 2: Locate ‘Net Banking-Login (Retail & Corporate)’, on the top of the homepage, under the navigation bar highlighted in yellow, and click on it.
Step 3: On the bottom right of the Login page locate ‘New User Registration’ in the blur bar & click on it. After clicking on it, you will be directed to the Terms & Conditions page.
Step 4: After going through the Terms & Conditions, click on the ‘I Agree’ button in the blue bar, and you will be directed to the next page.
Step 5: On the next page, enter all the details carefully. Now scroll down a bit, enter Captcha, & click on ‘Send OTP’ in the blue bar.
Step 6: Enter the OTP received on your registered mobile number and create a ‘Customer ID’ & ‘Password’. Now use your customer ID & password to log in.
You are now registered with Canara Bank Net Banking.
.jpeg)
Step 1: Visit the official website of the Canara Bank Net Banking.
Step 2: Locate ‘Net Banking-Login (Retail & Corporate)’, on the top of the homepage, under the navigation bar highlighted in yellow, and click on it.
Step 3: After entering your username ID, password, & password, locate ‘Login’ on the bottom right page and click on it.
Disclaimer: If you don't remember your USER ID, then call the customer care of Canara Bank (1800-1030). Or, you can find the message when you register your account in the Canara Bank. That message will contain your USER ID and password for login.
Step 1: Visit the homepage of Canara Net Banking.
Step 2: Locate ‘Net Banking-Login (Retail & Corporate)’, on the top of the homepage, under the navigation bar highlighted in yellow, and click on it.
Step 3: Locate ‘Create/Reset Login Password’ on the bottom right of the Login page in the yellow bar & click on it.
Step 4: On the next page, enter the required details (User ID, DOB, PAN Number, & Mobile No.) and enter the OTP received on your registered mobile number.
Step 5: Now you can reset your new password.
You can easily transfer funds via NEFT, RTGS, or IMPS. Here is a simple guide on how to transfer money using Canara Bank Net Banking:
Step 1: Visit the official website of Canara Bank & log into Canara Bank Net Banking (the step-by-step process is mentioned above in the blog; you can go there and check it).
Step 2: On the next page, select ‘Fund Transfer’ & choose the type of transfer (such as NEFT, RTGS, or IMPS).
Step 3: Enter the recipient’s details ( like Account Number, and IFSC Code), now enter the amount you need to transfer.
Step 4: Enter the transaction password and click on ‘Submit’.
Here is the table that will give you a better understanding of charges for transferring funds via Canara Bank Net Banking:
Transfer Method | Charges | Limits |
NEFT (National Electronic Funds Transfer) | ₹2.25 + GST for amounts up to ₹1,000 ₹2.25 + GST for amounts above ₹1,000 and up to ₹10,000 ₹4.75 + GST for amounts above ₹25,000 and up to ₹1 lakh |
OR
.jpeg)
Step 1: Visit the official website of Canara Bank Net Banking and log into your Canara Bank Net Banking account (the step-by-step process is mentioned above in the blog; you can go there and check it).
Step 2: In the next step, locate ‘Pay & Transfer’ the 2nd option in the Navigation Bar, after clicking on it, a menu will pop up under it.
Step 3: Locate the ‘Beneficiary Maintenance’ 2nd option in the menu; after clicking on it, 2 options will pop up; click on the 2nd ‘Add Beneficiary’.
Step 4: On the next page, click on ‘Within Bank’ if the account holder is in Canara Bank; otherwise click on ‘Other Bank’.
Step 5: Fill in all the details (like name, account number, account type, and IFSC code) & click on ‘Add’ under IFSC Code in the blue bar & ‘Confirm’ it.
Step 6: Enter the Transaction Password & OTP received on your registered mobile number. Now click on ‘Submit’.
Also Read – Canara Bank Locker Charges
.jpeg)
Step 1: Visit the official website of Canara Bank & log into Canara Bank Net Banking (the step-by-step process is mentioned above in the blog; you can go there and check it).
Step 2: On the next page, locate 'Services', the 7th option written in blue, & click on it.
Step 3: Now locate the ‘Preferences’ last 4th option in the yellow bar on the left of the page.
Step 4: Select ‘Change Users Limit’ in the 4th option under Preferences.
Step 5: Various options will pop up under My Transactions.
Step 6: Here you can change the transaction limit for different kinds of transactions.
For eg: If you want to set a transaction limit for ‘NEFT’, then the process would be:
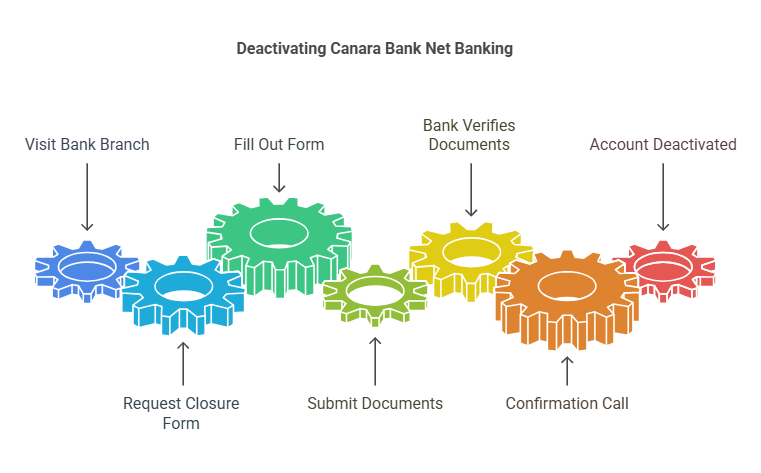
To deactivate your account, you’ll have to visit the branch of Canara Bank. Here’s the step-by-step process:
Step 1: Visit your nearest branch of Canara Bank.
Step 2: Ask for an account closure form & fill in all the details carefully.
Step 3: Submit the form to the branch along with the documents (like your KYC documents, unsend chequebook, bank passbook, & debit card).
Step 4: After verifying your documents, you’ll get a call from the bank to confirm your request.
Step 5: Once confirmed, the bank will deactivate your account within a few days.
Step 1: Download Canara Bank’s app ‘Canara ai1-Mobile Banking App’ from Google Play Store or Apple Play Store.
Step 2: Once you open the app, verify your mobile number.
Step 3: Now create a 5 5-digit Passcode to access Canara Mobile Banking.
Step 4: Now enter your Passcode and accept the terms & conditions.
Step 5: Now click on the ‘bank logo’ located at the bottom of the page in front of All.
Step 6: Locate ‘Activate A/C’ located on the top of the screen in the black bar & click on it.
Step 7: Now locate ‘Activate Mobile Banking Services’ in the blue bar & click on it.
Step 8: Now set your 6-digit MPIN according to your preference. (Whenever you transfer money via mobile banking, you’ll have to enter this MPIN).
Step 9: Re-enter your MPIN.
Step 10: Now select the activation type, either by ‘Activation Code’ or ‘Debit Card’.
Step 11: If you select ‘Debit card’ as activation type, now enter your ‘Debit Card Number’, ‘Expiry Date’, & ‘ATM Pin’.
Step 12: Click on ‘Submit’ located at the bottom of the page.
Step 13: On the next page, you can see your card details on the screen, now click on ‘Next’ located at the bottom of the page.
You can now easily check your account balance of Canara Bank via mobile banking. Let’s see how:
Canara Bank Net Banking is designed to make life simpler in the management of accounts from anywhere, at any time. The Internet provides a facility for checking one's account balance, paying bills, transferring funds, and even ordering a chequebook within minutes. All that needs to be done is registering and logging in, and one is good to go about handling all the banking activities in a safe and hassle-free manner. It's like having a bank in one's pocket!
Send money to any other bank account in the country. |
Request Cheque Book or Cards | Order chequebooks or cards online through the portal. |
Open Accounts | Open new accounts online through the portal. |
Mobile Banking | Manage your account using the mobile banking app or website. |
Account Statement | View your account statement online. |
Varies depending on the bank
IMPS (Immediate Payment Service) | ₹3.50 + GST for amounts up to ₹1,000 ₹5 + GST for amounts above ₹1,000 and up to ₹100,000 ₹15 + GST for amounts above ₹100,000 | Varies depending on the bank |
*T&C Apply
Q 1: How can I check my Canara Bank account balance?
To check your Canara Bank account balance, simply give a missed call to the Canara Bank Missed Call number.
Q2. Can we share Customer IDs?
No.
Q 3. Does Canara Bank charge any fees for using online banking?
No, Canara Bank does not charge any fees for using its online banking services.
Q4. Can multiple accounts of Canara Bank be accessed with the same User ID?
Yes, one can have access to multiple Canara Bank accounts using the same User ID, even though they may be in different branches. However, all these accounts must be registered under the same mobile number.
Other Net Banking Services | |||


